3. WebGIS front-end map shows the principle of converting tile ranks number based on geographic scope (core)
3.1. Preface
In the previous section, we learned how to convert a pixel on the screen to the actual unit length (meter or latitude and longitude).After that,how do we use it next? How does it relate to our front-end display map? In this section, I will try to answer these two questions one by one in detail. Say a topic, this series of articles I will give less code, more drawing flow charts or UML diagrams to communicate with everyone, first, it is easy for people who don’t have a lot of GIS and programming skills to understand. Second, it will make you pay more attention to the principle rather than the realization of some code.
3.2. Introduction to Image Pyramid
We have repeatedly mentioned the concept of image pyramid before, but did not give a general introduction to it, here I will add this concept.
3.2.1. Why is there the concept of image pyramid?
Now, I’m assuming that we have a 1G image on our server that needs to be displayed on the front end.Our traditional approach is to first download the 1G image from the server to the front end, and then the browser loads and renders the image.But think about it, first of all, the time it takes for the client to download 1G images must be a long process, and secondly, the browser loading such a large file will most likely cause it to crash. The most important problem is that our demand is only to browse some levels in a certain area of the whole picture, but now download the whole picture, which also leads to data insecurity (download to local), and every time we zoom in and out and drag and drop, the browser will take a long time to render.
It can be seen that the traditional way is not in line with the actual needs. Later, there were new solutions, such as the concept of dynamic mapping in the IMS version of arcgis.That is, the current side of the request contains the range to be displayed, the size of the display window and other parameters, the background dynamic cut out a tile in the raw data, and then return this data to the foreground, and the server to do the tile cache.
However, this method is still slow to map the front end and puts too much pressure on the map server. Finally, our image pyramid solution has emerged.
3.2.2. Principle
The image pyramid is that we first set the original image according to the user’s needs, such as how many scales the user needs to display. Which area of the original image needs to be displayed, and the original image is divided and extracted according to these requirements. Figure:
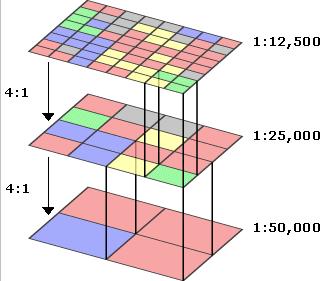
The lowest level is the tile with the smallest scale we extracted and divided, and the top layer is the tile with the largest scale.We can observe a rule that: the smaller the scale, the less the level tile data, the larger the other. The result of this rule is that the smaller the scale, the faster the level cut, and the more image range smaller the tile of the same size.
When we build the image pyramid and request the map from the front end, we will only find the corresponding tiles in the corresponding level in the sliced tiles cache. Then, by splicing the requested tiles together at the front end, we can get the tiles within the visual range at the level required by the user.
3.3. Conversion principle of tile ranks number
3.3.1. Why convert the tile ranks number?
In the previous section, I gave the organizational form of the document after the image is cut into discrete graphs, which shows you that under this cut, the organization of the file is actually organized according to the level of the tile, row, column number to organize.In fact, the same is true of the organization style of the compact tile (Bundle), but it has to do a series of conversion after getting the ranks number, such as reading the index file to find the offset in the file, which I’ll discuss in a later chapter.Moreover,the standard WMS request also involves the conversion of the ranks number.The WMS request has a Bbox parameter, and this parameter is also related to the conversion of the ranks number. In the standard WMTS request, the three parameters TILEMATRIX, TILEROW, and TILECOL represent the level, row, and column number of the tile.
It can be seen that regardless of the tile request for which offline or online map, the level, col, and row of the tile are the core that the request can implement.
3.3.2. Tile ranks number conversion principle
Below, let’s first give the formula for the conversion of the tile ranks number.
Assume that the origin of the map cut is (x0, y0), the tile size of the map is tileSize, and the actual distance represented by one pixel on the map screen is resolution. The formula for calculating the ranks number of tiles where coordinate points (x, y) are located:
col = floor((x0 - x)/( tileSize*resolution))
row = floor((y0 - y)/( tileSize*resolution))
This formula should not be difficult to understand.First calculate the actual length of a tile in brief, and then calculate the current screen geographical coordinate points from the starting point of the tile cut map between the actual distance of the RealSize,divide the actual distance by the actual length of a tile,the tile column number at this time: LrealSize/LtileSize.
3.3.3. The conversion principle of resolution
As I described in the previous section “Principles of Map Scale Conversion”, when the system is latitude and longitude system, this resolution can directly use the resolution in the cut document. If the system is a plane coordinate system, the resolution algorithm is:
resolution=scale*inch2centimeter/dpi.Where scale is the map scale, inch2centimeter is the inch to centimeter parameter, and dpi is the pixel contained in 1 inch.
3.4. Application in the actual system
Now I summarize the actual application requirements as follows:
(1)Get the height and width of the canvas and the geometric range of the map to be displayed at this time.
(2)Get the height and width of the canvas and the geometric range of the map to be displayed at this time, as well as the level of the map that needs to be displayed
Finally, we need to get the range of tile ranks number under these two requirements.
3.5. Conversion process
3.5.1. Flow chart
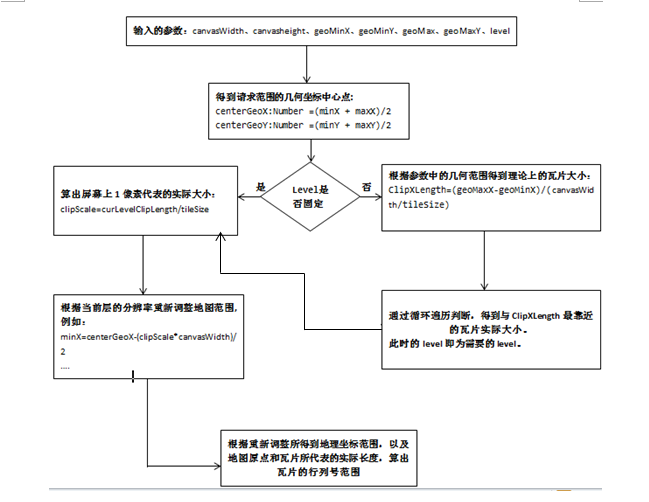
For the two requirements mentioned in Section 3, we have a different conversion process, and I’ll start with the flowchart:
3.5.2. Detailed explanation
Some common variables are involved in the following steps, I will use English to represent some parameters for the sake of description.
originX,originY:Cut map origin coordinates when the map is cut.
tileSize:Screen pixel size of tiles.
Level:Map level.
resolution:The actual unit size represented by one pixel of the screen at a map level.
canvasWidth、canvasHeight:The length and width of the screen.
geoMaxX、geoMinX:The largest, minimum X coordinate in the geographic range.
1 The first step, get the center point in the request geographic range (centerGeoPoint)
This conversion is relatively simple, but why should we first convert this center point? The reason is that the real geographic range we need in the end is not necessarily the geographic range corresponding to the screen range, which is most likely greater than the geographic range of the screen.In fact, it must be greater than that, later will explain the design of tile layer classes, we will mention a geographic extent buffer width, then you can better understand why you want to get the central point in the geographic range first.
2 The second step is to determine whether the request contains the map level to be displayed and handle it separately.
3.5.2.1. 5.2.2.1 Include Level
If the Level used has been specified in the request, we can then use it directly to convert the actual request range of the map.
3.5.2.2. 5.2.2.2 Non-include Level
When there is no Level in the request, our conversion will be more complex. The purpose of this conversion is to find out which level is the most suitable display for the map at this time, namely nearest Level.The process is to first determine the actual size of the tiles we need at this time based on the geographic extent and screen size range in the request. Which is:(geoMaxX-geoMinX)/(canvasWidth/tileSize),that is, the actual geographical length divided by the number of tiles at this time, thus getting the actual size of the tile in our request.
However, at present we cannot guarantee that the graph we are cutting will necessarily have a scale in this demand. So we also need to do a traversal, traversing all the scale slots in our map,find out a tile with the actual size of this demand scale is closest to the real tile actual size, and the actual size of this tile corresponding to the map scale, that is, we get the most suitable scale,the map level represented is the nearest rest level to the requirements.
3 The third step, calculate the geographic range for the screen range (minX, minY, maxX, maxY)
In the first step, the centerGeoPoint is obtained, in the second step, the level is obtained, this step is very simple.
First get the actual size of the pixel under Level, which is resolution. Then multiply or subtract half the screen length (canvasBounds) by the range of the resolution, which is the actual geographic range that the screen range in the requirement should correspond to under the obtained Level.
Take the actual geographic coordinates corresponding to X in the upper left corner of the screen as an example:
minX =centerGeoPoint - (resolution* canvasWidth)/2;
By the way, the geographic range corresponding to this screen range is calculated,which effect is very large, In later screen coordinates to geographic coordinates, and geographic coordinates to screen coordinates, as well as offset compensation on the conversion, which is a critical parameter.
4 The fourth step, calculate other parameters, such as the starting number of the tile ranks number of tiles
This step is the finishing work, and the final conversion is performed based on a series of parameters calculated before.
3.5.2.3. 5.2.4.1 Tile starting ranks number(fixedTileLeftTopNumX、fixedTileLeftTopNumY)
After we know the geographic scope of the request, the conversion of the starting ranks number should flow more easily.However, we need to make a slight supplement here, the geographical range we calculated does not guarantee that the geographic coordinates of the starting tiles of the real tiles coincide with the geographic extent of the upper left corner of the geographic range.
Formula is:
fixedTileLeftTopNumX = Math.floor((Math.abs(originX - minX))/resolution*tileSize);
fixedTileLeftTopNumY = Math.floor((Math.abs(originY - maxY))/resolution*tileSize);
3.5.2.4. 5.2.4.2 Actual geographic range:(realMinX、realMaxY)
We only got the geographic range of the screen range before, but when we converted the tile needed for this range, the geographic range of these calculated tiles is not necessarily the geographic range corresponding to the screen range, then,we need to recalculate the actual geographic range.
realMinX = fixedTileLeftTopNumX * curLevelClipLength + originX;
realMaxY= originY - fixedTileLeftTopNumY * curLevelClipLength;
3.5.2.5. 5.2.4.3 Upper-left offset pixels(offSetX、offSetY)
Since the first tile in the geographic range, that is, the first tile in the upper left corner, is not necessarily completely included in the geographic extent of the screen, then another pair of parameters is involved here, with the upper left corner offset pixels.
Why is this parameter required? The reason is that when we request the tiles back, we have to do a conversion, that is, the coordinates of the top left corner of each tile should correspond to which screen coordinates on the layer (TIleCanvas), which offset pixel is prepared for this conversion.
offSetX = ((realMinX- minX )/resolution);
offSetY = ((maxY - realMaxY )/resolution);
Again, resolution represents the actual unit size represented by a pixel under this Level.
3.5.2.6. 5.2.4.4 Number of tiles on the X and Y axes(mapXClipNum、mapYClipNum)
Here I will give a schematic diagram of the relationship between the geographic extent of the screen and the actual geographic range of the tile requested:
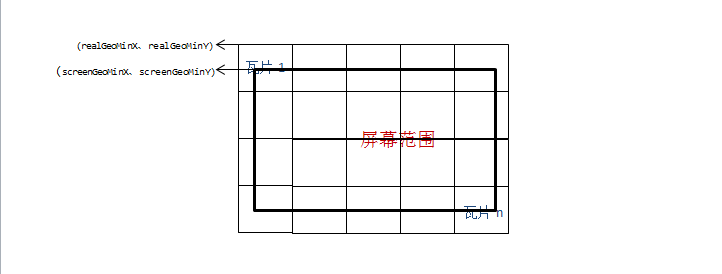
As I mentioned before, the number of tiles represented by the tiles in the geographic range of the screen we have found is basically larger than the screen range itself.In fact, this reason is not difficult to understand, because the tile is the smallest unit of the map representation, it is impossible to divide,So when we request the starting ranks number of the tile, we use the Math.floor function to find the tile ranks number closest to the top left corner of the screen range.However, in obtaining the number of tiles on the X and Y axes, we have to use the Math.ceil function, which is to find the number of tile ranks number closest to the lower right corner coordinates of the screen range.
The specific formula is:
mapXClipNum = Math.ceil((canvasWidth + Math.abs(offSetX))/tileSize);
mapYClipNum = Math.ceil((canvasHeight + Math.abs(offSetY))/tileSize);
3.6. Summary
According to the above steps, we can finally find the ranks number of the tile, and the number of X and Y axes needed, while, we also obtained the parameters needed to draw the tiles on the canvas, and the upper left corner is offset by pixels.
This section believes that everyone will be tired, because there are too many processes and formulas in this section, but also for this, which section is the most important one in our series of introducing the front-end display map,I hope everyone can work with me to make a good guess and deliberation on this principle. In the next section, I will write a relatively easy class, the main introduction will be how to use it after we calculate the ranks number. I will introduce and summarize several common ways of requesting online and offline maps. Welcome your continuous attention.