Seeing in 3-D Stereo
Contents
Both the physical and psychological factors that underlie seeing in stereo are looked into, with attention paid to the notion of parallax. Some simple experiments that you can do to test and enhance your stereo visual capabilities will aid in fostering your skills needed to work with stereo imagery. The reason for the visual impression that objects so viewed may appear extended (exaggerated) vertically is presented in the base to height concept. The proper way to use a stereoscope is stated. Some encouragement is offered that many individuals can learn to see stereo without having to use a pocket-type or other stereoscope. The first examples of stereo pairs are displayed, with the suggestion that these be printed out for examining scenes under a stereoscope (which you may need to buy or otherwise procure.
Seeing in 3-D Stereo
This style of viewing is as familiar as seeing. When we alternately blink our eyes, objects appear to move slightly sideways. This shift is even more dramatic when we hold an index finger about 30 cm (18 in) in front of our nose and perform the above eye activity. This apparition comes from the principle of parallax. Parallax is the apparent displacement of a viewed point or small object at a distance that results from a change in the point of observation. For a person, that change in the point of observation could simply be from one eye to the other at a fixed location or from relocating from one viewing spot to another. Our line of sight from each eye is not quite parallel to the line between our nose and the selected target, but converges from the eye pair, so that the left eye sees a bit of the left side of the target not seen by the right eye, while the right eye sees a bit of the right side, missed by the left eye. In this way our eyes send a signal to the brain which, on further processing, creates the impression of depth.
This same effect lies at the heart of stereo viewing of photo pairs, taken either from two lateral positions on the ground, or, in aerial photography, as successive photo pairs with about 50% overlap along a single flight line, or with similar sidelap between pairs from adjacent flight lines, with some of the scene in common (see page 10-3 for further details). When we position the stereo pair properly left-right and then view them through a stereoscope, the eye-brain reaction is an impression of surface curvature or relief, as though we’re looking down from a plane at the ground. A pocket stereoscope consists of two lenses that we can adjust along a slide bar to be as far apart as our eyes, placed in a raised mount (on collapsible legs) about six inches above the central region of the stereo pair.
The sense of relief may be exaggerated relative to reality. The degree of vertical exaggeration (VE) depends on the base to height ratio (B/H), which depends on the scale of the photos. The scale, in turn, shows the actual horizontal ground distance (B) between any two equivalent points, identifiable in the two photos, and the height (H) of the camera, during the exposure of each photo in the pair. These points will, of course, not occupy the same position in the two photos because of the forward motion of the imaging platform. The vertical exaggeration also depends on the apparent height (h) of the viewer’s eyes and the breadth (b) between the eye centers of the particular viewer. So VE = (B/H)(h/b). VE typically ranges between 1+ and 6+ for B/H ranges between about 0.2 and 1.2.
` <>`__11-7: Calculate the vertical exaggeration of this set of conditions: Distance on ground = 1800 meters; Height of camera above ground = 4000 meters; Apparent height of viewer’s eyes = 40 cm; width between eyes = 6 cm. `ANSWER <Sect11_zanswers.html#11-7>`__
If you have a pocket stereoscope, you may see the stereo effect by placing it, with legs extended, against the image below as it appears on the screen. This viewing usually doesn’t work for most observers, so, it is probably necessary to print the pair, cut them apart, and then view them with the stereoscope. You likely will have to move one or the other laterally until the area viewed in common fuses visually into the stereo effect.
There are several stereo pairs on this page and on page 11-8. If you try to print out the page to get these images to cut apart and examine in stereo, the length of the page will require several printed pages. To avoid this, we have place most of the stereo pairs on a separate page, without text, which will reduce the number of printout pages needed. Access this page for printing by pressing on the word STEREO in blue/purple; return to this page or 11-8 by clicking on the browser BACK button.
We extracted the pair below, showing mature topography in a dissected hilly terrain, from their proper positions in the full photos and placed them in juxtaposition, separated enough for stereo viewing. You may see the slight differences in shape (and shadowing) of the same hills in the two photos that result from the changed viewing positions. (STEREO)

` <>`__11-8: In the above stereo pair, assuming you have viewed them stereoscopically, where is the apparent highest peak? `ANSWER <Sect11_zanswers.html#11-8>`__
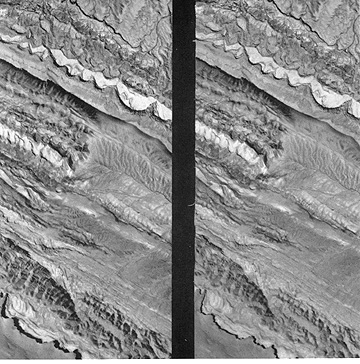
` <>`__11-9: Which way do the strata (bands of rocks) appear to be inclined (the geologist says “dipping”), to the upper right or to the lower left? `ANSWER <Sect11_zanswers.html#11-9>`__
So, if you do not succeed in seeing stereo on the screen, but have a stereoscope, you may print the above views and examine them on a table. And, perhaps you will need to move the images independently (cut them apart) to find the right separation. Again, we have scanned a pair of photos of the Little Dome (Wind River Basin, Wyoming) anticline (upward arching fold) and reproduced them below at rather large size. After printing and cutting apart, put the left one A (or top one if it has been repositioned to fit your monitor) to the left of the right A (or bottom one) and check its stereo expression. It may show up just fine or it may look funny. The positioning relative to the sequence in the flight line must be proper for normal stereo to take place. Since there was no information available to the writer as to whether the top photo was taken first or second, you will have to experiment with choosing which photo to place left of the other, switching until the normal effect leaps out at you. (STEREO)
|
|


These you must print as movable products. The upper photo is the left one. Hold one in place and move the other laterally until stereo appears. You may have to bend (curl) the paper of one to see the corresponding area in the other. Be sure to trim any borders to eliminate any white effect.
` <>`__11-10: In stereo, which seems to be lower: the elongate hill within the anticline or its rim? `ANSWER <Sect11_zanswers.html#11-10>`__